How to Join a Gimkit Game Using a Game Code | Joining a Gimkit game with a game code is a straightforward student task: your teacher provides the code, you enter it on the game-joining page, choose the name you will use in the session, and enter the waiting lobby. From there, the host controls when the activity begins.
This guide focuses specifically on that student-side joining journey. It explains what to do from the moment your teacher gives you a game code through the moment the game starts, including what you should look for on each step and how the process differs across common classroom devices.
It is intentionally focused on using a game code to enter a specific Gimkit game rather than covering every Gimkit joining method or turning the article into a general troubleshooting guide. If you already have the code in front of you, the instructions below are designed to take you through the process in the correct order.Looking for comprehensive classroom resources and educational technology insights? Explore GimkitApp for expert guides, teaching strategies, game modes, and the latest updates to enhance student engagement.
What You Need Before Joining a Gimkit Game
Before opening the game, make sure you have the basic information and equipment needed to participate. In a typical classroom, your teacher handles the game setup while you only need to prepare your device and use the information provided.
You generally need:
The game code provided by your teacher or host
A compatible device, such as a Chromebook, laptop, desktop computer, phone, or tablet
A web browser for opening the Gimkit joining page
An internet connection so your device can communicate with the live session
A player name or nickname that follows your teacher’s classroom instructions
A few moments to remain in the lobby while the host gets everyone ready
You do not need to understand how the teacher created the kit or configured the game before joining. From the student’s perspective, the important information is the current game code and the instructions given by the person hosting the session.
Before you start, ask yourself:
Do I have the code?
Make sure you actually have the code before beginning. If the teacher is displaying it on a classroom screen, keep the code visible while you enter it.
Am I using the device I intend to play on?
If possible, use the same device you will use throughout the activity. Switching devices after entering can interrupt your preparation.
Do I know what name to use?
Some teachers have specific classroom naming rules. If your teacher has told everyone to use a first name, initials, assigned nickname, or another format, follow those instructions.
Am I ready to stay on the game page?
Once you enter the session, avoid leaving the page unnecessarily while waiting for the host.
The Complete Process: From Game Code to Gameplay
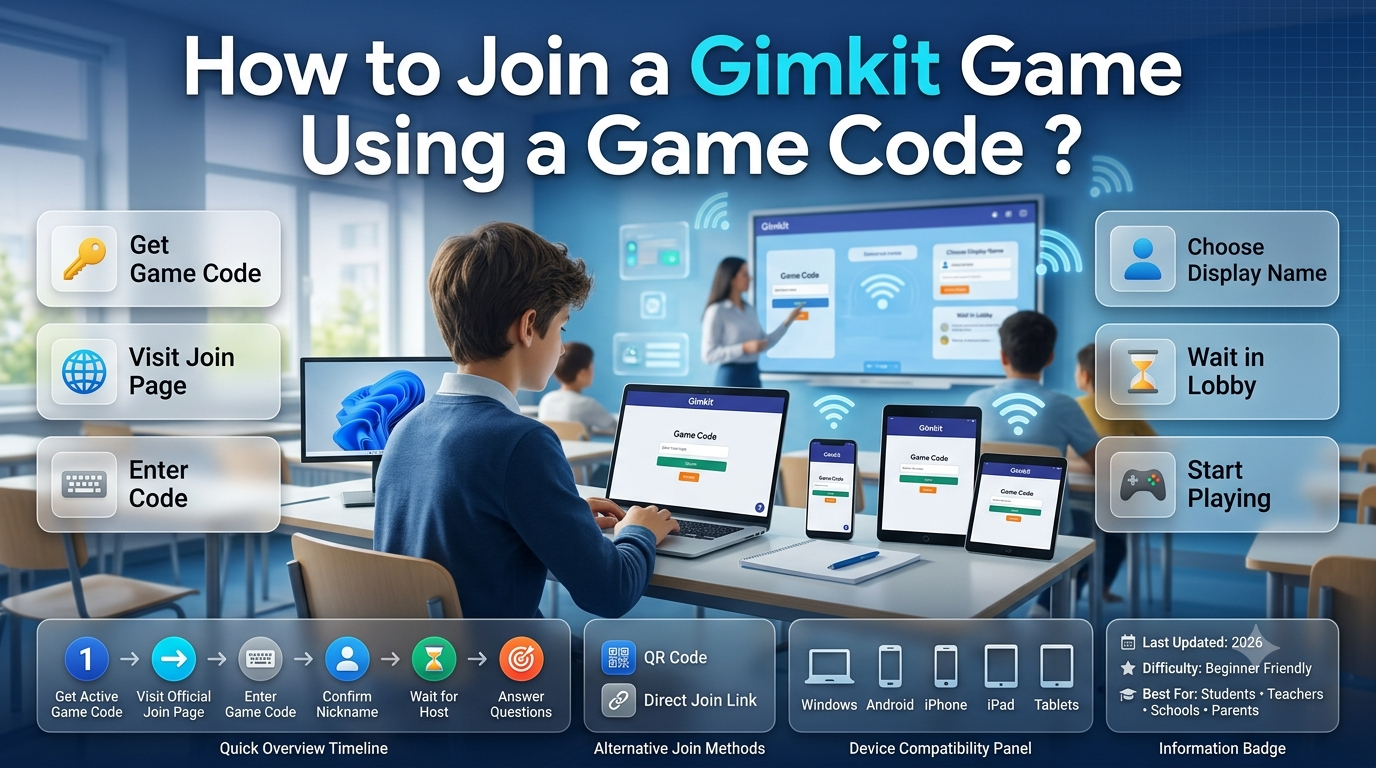
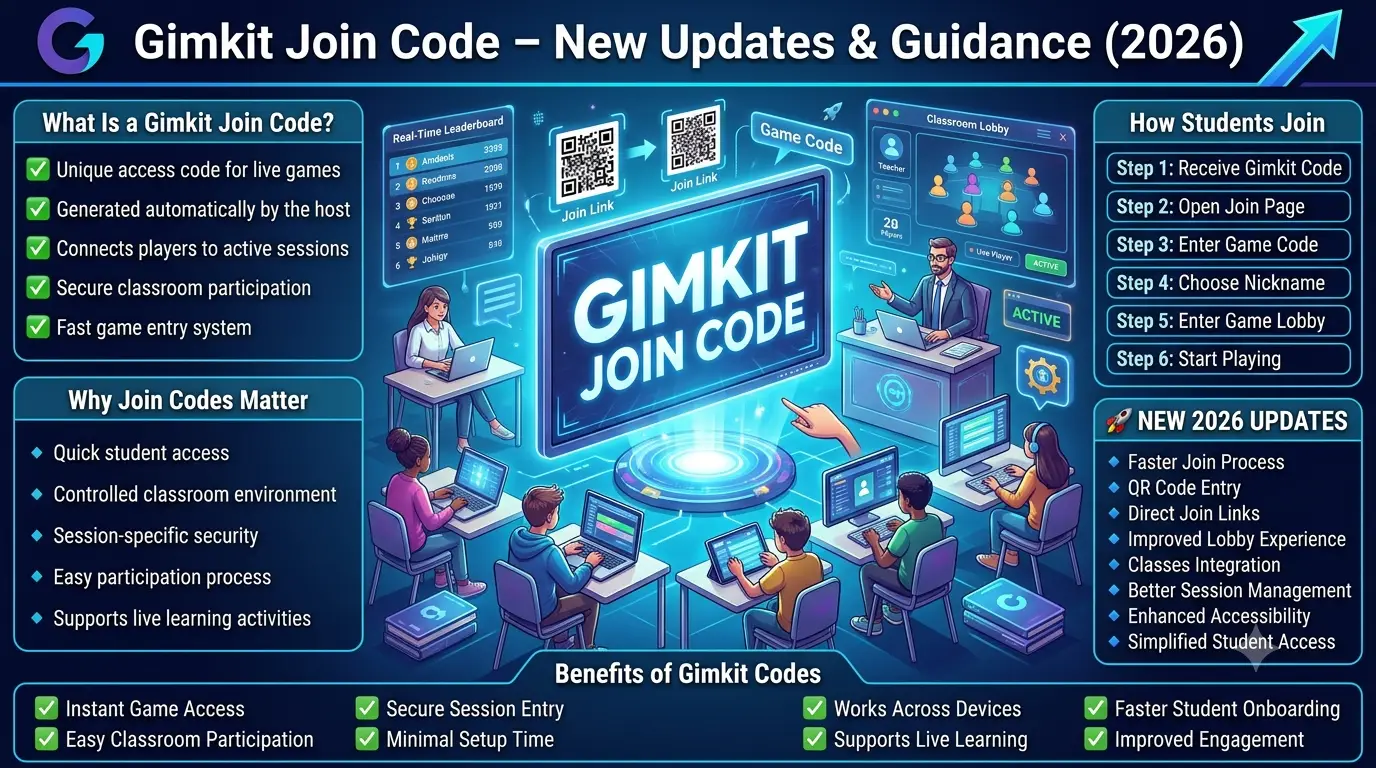
For a student, the entire process can be understood as a simple sequence:
Get the game code
↓ Open the Gimkit game-joining page
↓ Enter the game code
↓ Submit the code
↓ Enter your player name
↓ Enter the game lobby
↓ Wait for the host
↓ Follow the game instructions when it begins
The important thing is that these steps happen in order. You do not need to jump between different Gimkit pages or repeatedly restart the process once you have successfully entered the session.
Step 1: Get the Gimkit Game Code From Your Teacher
Your first step is simply to obtain the game code for the activity you are about to play.
In a classroom, the teacher may display the code on a projector or interactive board. In another setting, the teacher might provide it through classroom instructions or another communication channel.
The exact way you receive the code is less important than making sure you have the correct code for the game your teacher is currently running.
If the teacher displays the code
Look at the classroom screen and carefully read the characters before entering them. If you are sitting far from the display, wait until you can clearly identify every character rather than guessing.
If the teacher reads the code aloud
Listen carefully and enter the characters in the same order they are given. If you miss part of the code, ask the teacher to repeat it rather than entering a code you are unsure about.
If the teacher posts the code digitally
Keep the classroom instructions available while you enter the code. This is particularly useful if the code contains several letters and numbers that are easy to confuse.
Before moving on
Take a second to make sure you have the complete code.
You should not begin the joining process with only part of the information and hope the rest will become clear later.
Step 2: Open the Gimkit Game-Joining Page
Once you have the code, open a browser on your device and go to the Gimkit page used for joining a game.
You can use a Chromebook, laptop, desktop computer, phone, or tablet. The physical device changes, but the basic student journey remains the same.
The goal at this stage is simple:
Get to the screen where Gimkit asks you to enter the game code.
You are not creating a new game, building a question set, or configuring classroom settings. Those are host-side activities. As a player, you are entering an existing session.
On a Chromebook
Open Chrome and navigate to the Gimkit joining page. Keep the browser focused on that page while you enter the code.
On a laptop or desktop
Open your preferred modern browser and navigate to the joining page. A physical keyboard can make code entry convenient, particularly when your teacher is displaying the code on a classroom screen.
On a phone or tablet
Open your browser and navigate to the same joining destination. A touchscreen keyboard is used for entering the code and your player name.
The important point is that the joining destination is the starting point for the student workflow. Once you are there, the process becomes a matter of entering the information provided by the host.
Step 3: Enter the Game Code
Now you can enter the code your teacher gave you.
Find the code-entry field and type the characters exactly as provided.
This is a small step, but accuracy matters because the code identifies the particular game session you are attempting to enter.
Enter the characters in order
If your teacher gives you a code such as:
ABC123
enter the characters in that same sequence.
Do not rearrange them or leave out a character because the code looks familiar.
Check your entry before continuing
Before submitting, quickly look at what you typed.
Check:
Are all characters present?
Are they in the correct order?
Did you accidentally press a key twice?
Did you enter an extra character?
Did you accidentally press a nearby key on the keyboard?
This should be a quick visual check, not a lengthy process.
On a touchscreen
Take a moment to check the code before continuing because touchscreen keyboards can make accidental taps easier.
On a physical keyboard
Use the keyboard normally and check the completed entry before submitting.
The purpose of this step is not to diagnose every possible code problem. It is simply to make sure your own entry matches the information your teacher gave you.
Step 4: Submit the Game Code
After entering the code, continue using the control provided on the joining screen.
At this point, Gimkit processes your request to enter the session.
For a student, there is no reason to keep submitting the same information repeatedly once the page has moved forward. Let the joining process complete before taking another action.
What you are looking for
The important change is that Gimkit moves you beyond the initial code-entry stage.
You may then be asked to provide your player name or continue with the information required for the session.
This is the transition from:
“I have a game code.”
to:
“I am entering this particular game session.”
That distinction is useful for beginners because successfully submitting the code is not necessarily the same thing as the game already starting.
Step 5: Choose Your Player Name
After the code has been accepted, the next part of the student experience may involve choosing or confirming the name that will identify you in the game.
Your teacher may have classroom rules about what students should use.
For example, the teacher might ask students to use:
Their first name
First name and last initial
A classroom nickname
An assigned identifier
Another teacher-approved format
The safest approach is simple:
Use the naming format your teacher requested.
Why your player name matters
Your name helps the host identify participants during the activity. It may also appear within the game’s player-facing experience.
A clear, recognizable name makes it easier for the teacher to know who has joined and helps prevent confusion when multiple students are participating.
Check your spelling
Before continuing, look at the name you entered.
A small spelling mistake may not stop you from entering the game, but it can make it harder for the teacher or classmates to recognize you.
Avoid unnecessary experimentation
If this is a classroom activity, the joining screen is not the place to test unusual names or repeatedly change your identity. Follow the instructions given by the host.
Step 6: Enter the Gimkit Game Lobby
Once your entry is complete, you arrive at the game’s waiting area.
This is an important stage because being in the lobby means you have joined the session, but the gameplay may not have started yet.
The host controls the transition into the activity.
Think of the lobby as the meeting point between joining and playing.
What you should do in the lobby
Once you are there:
Confirm that your player name looks correct.
Keep the game page open.
Pay attention to your teacher.
Wait for the host to begin.
Avoid leaving the session unnecessarily.
Be ready to follow the instructions when the game starts.
You generally do not need to do anything complicated while waiting.
How to Know You Have Successfully Joined
Beginners sometimes assume that something has gone wrong simply because they are waiting in the lobby.
A successful joining experience can be understood as a sequence:
Code entered → session accepted → player information entered → lobby displayed
Once you have reached the game’s waiting area with your player identity established, you have moved beyond the initial joining stage.
The fact that the game has not started yet does not necessarily mean you have failed to join.
The teacher may simply be waiting for other students to enter before starting the activity.
Joining Is Different From Starting the Game
This is one of the most important concepts for first-time students.
Joining
Joining means that your device has entered the host’s game session.
Starting
Starting means that the host has begun the actual gameplay.
These are two different stages.
A student can successfully join and then remain in the lobby for a short period while the teacher waits for classmates.
For example:
Your teacher launches the session and gives the class the code. You enter the code, provide your name, and arrive in the lobby. Your classmates are still joining, so the teacher waits. Nothing is wrong with your device simply because the gameplay has not started yet.
This distinction prevents one of the most common beginner misunderstandings: assuming that reaching the lobby means the game should immediately begin.
Step 7: Wait for the Host to Start
Once you are inside the lobby, the next action belongs primarily to the teacher or host.
Your job is to remain ready.
While waiting:
Keep the Gimkit page open.
Listen to the teacher.
Make sure your device remains available.
Avoid navigating away from the game unnecessarily.
Watch for the game to begin.
Follow any instructions provided by the host.
If the teacher is still helping classmates join, give them time to finish.
You do not need to restart your joining process simply because another student has not entered yet.
What Students Should Not Do While Waiting
A smooth classroom session depends partly on students knowing when not to interact with the page.
Avoid:
Re-entering the code unnecessarily
If you are already in the lobby, you have progressed beyond the initial code-entry stage.
Leaving the page without a reason
Switching away can make it easier to miss the moment the activity begins or an instruction from the teacher.
Changing your name repeatedly
Use the name format requested by your teacher and keep it consistent.
Asking for the code again when you are already inside
If you can see that you are in the game lobby, the code-entry stage has already been completed.
Assuming the game is broken because it has not started
The host may simply be waiting for the class.
Step 8: Follow the Host When the Game Begins
Once the teacher starts the game, the experience changes from preparation to participation.
At this point, pay attention to the instructions presented by the game and the teacher.
The exact gameplay experience depends on the game mode and the activity the host selected, so there is no single set of actions that applies to every Gimkit session.
What remains consistent is the transition:
Waiting in lobby → Host starts → Gameplay begins
Your responsibility is then to follow the instructions presented on your screen and any additional classroom directions from your teacher.
How to Join a Gimkit Game on a Chromebook
Chromebooks are common in schools, and the basic joining process is particularly straightforward.
Chromebook joining sequence
1. Open Chrome.
Use the browser available on your Chromebook.
2. Open the Gimkit game-joining page.
Navigate to the appropriate joining destination.
3. Enter the game code.
Type the code supplied by your teacher.
4. Submit the code.
Continue from the code-entry screen.
5. Enter your player name.
Use the naming format your teacher requested.
6. Enter the lobby.
Remain on the game page while waiting.
7. Follow the host’s instructions.
Begin playing when the teacher starts the session.
Chromebook-specific habit
Because school Chromebooks can have many tabs open during a lesson, it helps to keep the Gimkit game visible once you have joined. This makes it easier to notice when the session transitions from the lobby into gameplay.
How to Join a Gimkit Game on a Laptop or Desktop
The process on a laptop or desktop is almost identical.
Open your browser, navigate to the game-joining page, enter the code, provide your player name, and wait in the lobby.
A physical keyboard can make the code-entry stage comfortable, particularly when the code is displayed on a projector.
A simple desktop workflow
Browser → Gimkit joining page → Game code → Player name → Lobby → Game
If your teacher is presenting instructions on the same computer, pay attention to the order in which they want the class to proceed. The goal is to join the session first and then remain ready for the teacher’s signal.
How to Join a Gimkit Game on a Phone
Students can also use a phone to enter a Gimkit game.
The basic workflow remains:
Open your mobile browser.
Go to the Gimkit game-joining page.
Enter the game code.
Continue.
Enter your player name.
Wait in the lobby.
Follow the host’s instructions.
Phone-specific considerations
The smaller screen means that it is particularly useful to check your typed code before submitting it. Touch keyboards can make accidental taps easier than physical keyboards.
Once you are in the lobby, keep the game page available so you can see when the host begins the activity.
How to Join a Gimkit Game on a Tablet
A tablet follows essentially the same student workflow as a phone.
Open the browser, navigate to the game-joining page, enter the provided code, continue through the player-name step, and wait in the lobby.
The larger screen can make classroom instructions easier to view than on a phone, while the touchscreen still means that carefully checking the code before submission is worthwhile.
Joining When the Teacher Displays the Code on a Projector
A common classroom setup looks like this:
Teacher starts the activity → Code appears on the classroom screen → Students enter it → Students appear in the lobby → Teacher starts the game
If the code is displayed on a projector, do not rely on a quick glance if you cannot clearly see every character.
Instead:
Look at the displayed code.
Read it carefully.
Enter it in the same order.
Check your entry.
Submit.
Continue through the player-name step.
Return your attention to the teacher.
The classroom screen is there to provide the information needed for entry. Once you have successfully joined, your attention should return to the teacher and the activity.
Joining When the Teacher Reads the Code Aloud
Sometimes a teacher may read the game code to the class rather than leaving it displayed continuously.
In this situation, concentration matters more than speed.
Listen to each character and enter it in the order given.
If you miss a character, do not try to reconstruct it from memory if you are unsure. Ask the teacher to repeat the code or the specific part you missed.
A good classroom habit
Repeat the characters mentally as you type them, then quickly compare your completed entry with what you heard.
This is especially useful when the code contains a mixture of letters and numbers.
Joining When the Code Is Shared Digitally
In online or technology-supported classrooms, the teacher may provide the game code in written instructions.
For example, the code might appear alongside the activity instructions in the classroom’s digital communication space.
In that situation:
Open the provided classroom instructions.
Identify the current game code.
Open the Gimkit game-joining page.
Enter the code.
Continue with the player-name step.
Enter the lobby.
Return to the classroom instructions or teacher’s live session as needed.
The key is to distinguish the game code from surrounding classroom information. Do not accidentally copy additional text into the code field.
For the latest gaming news, expert reviews, and walkthroughs, readers can also visit IGN, one of the world’s leading gaming websites.
Joining a Gimkit Game for the First Time
If you have never joined a Gimkit game before, the process can initially seem unfamiliar simply because you do not know what happens after each step.
Here’s the entire first-time experience in plain language:
Your teacher says:
“We’re playing Gimkit. Here’s the game code.”
You:
Open a browser and go to the game-joining page.
Next:
You enter the code your teacher provided.
Then:
You continue to the player-name stage.
Next:
You provide the name you will use during the activity.
Then:
You enter the game’s lobby.
Finally:
You wait for your teacher to start the game.
That’s the complete basic journey.
You don’t need to understand every Gimkit feature before joining. The game mode, question set, and activity settings are selected by the host.
What the Teacher Controls and What the Student Controls
Understanding this division makes the joining process much easier.
Stage
Student
Teacher/Host
Game preparation
Waits for instructions
Creates and configures the session
Code distribution
Receives the code
Provides the code
Code entry
Enters the code
Monitors participants
Player identity
Enters the requested name
Sets classroom naming expectations
Lobby
Waits and prepares
Organizes the session
Game start
Waits for instructions
Starts the activity
Gameplay
Participates
Controls the hosted session
This explains why some actions are simply outside a student’s control.
For example, if you are already in the lobby, you generally cannot decide when the teacher begins the game. Your role at that point is to remain ready and follow the host’s instructions.
What Information Should a Student Have Before Entering?
A student does not need a complete understanding of the teacher’s Gimkit setup.
For the basic joining process, the most important information is:
1. The game code
This identifies the session you are being asked to join.
2. Your required player name
Follow whatever naming instructions your teacher has given.
3. The teacher’s activity instructions
These may explain what to do once the game starts.
That’s enough to get through the basic entry process.
The Difference Between the Code Screen and the Lobby
These two stages are easy to confuse when you’re new to Gimkit.
Code-entry stage
You are telling Gimkit which hosted game you want to enter.
Your main action:
Enter the game code.
Lobby stage
You have already moved into the session and are waiting for gameplay.
Your main action:
Wait for the host and remain ready.
Understanding this distinction helps you know when your active input is required and when you should simply wait.
What to Do If Your Teacher Is Still Getting the Class Ready
A teacher may start the session before every student is ready.
If you have successfully entered the lobby, there is usually no need to repeatedly interact with the joining screen.
Instead:
stay in the lobby
listen to the teacher
keep your device ready
wait for the activity to begin
follow any additional instructions
A classroom game often has a short preparation period before actual gameplay begins. That waiting period is part of organizing the group rather than necessarily indicating a problem with your individual entry.
Joining at Different Points in a Classroom Activity
The joining process can look slightly different depending on what the teacher is doing.
Before everyone is ready
You may enter the lobby and wait while other students join.
While the teacher is organizing the class
Remain available and pay attention to instructions.
Immediately before gameplay
Check your player name and make sure the game page remains open.
Once the game begins
Stop focusing on the joining process and follow the activity itself.
The important transition is knowing when to move your attention from joining to playing.
A Student’s Game-Code Joining Checklist
Before entering
I have the game code.
I know what player name my teacher expects.
My browser is open.
I am ready to stay on the game page.
During code entry
I entered every character.
The characters are in the correct order.
I checked the entry before submitting.
I continued through the joining screen.
After entering
My player name is correct.
I am in the game lobby.
I am waiting for the host.
I am paying attention to classroom instructions.
When gameplay begins
I follow the instructions on screen.
I listen to the teacher.
I begin participating when the host starts the activity.
This checklist is intentionally simple: its purpose is to keep the student moving through the correct sequence without unnecessary steps.
Common Mistakes Students Make When Joining With a Game Code
Most beginner mistakes are not complicated. They happen because the student moves too quickly through a basic step.
Entering the characters in the wrong order
A student may see the code but accidentally rearrange two characters while typing.
Better approach: enter it in the same order in which it is displayed or provided.
Forgetting a character
Short codes can be easy to type incorrectly when students are rushing.
Better approach: check the completed entry before submitting.
Adding extra characters
This can happen when using a touchscreen keyboard or accidentally pressing a key twice.
Better approach: look at the final entry before continuing.
Using the wrong player name
A student may enter a random nickname when the teacher has given a specific naming instruction.
Better approach: follow the classroom naming rule.
Leaving immediately after reaching the lobby
A student may assume that nothing happened because the game has not started.
Better approach: recognize that the lobby is the waiting stage and remain there until the host begins.
Trying to control the start of the game
Students sometimes expect the game to begin immediately after they enter.
Better approach: wait for the host’s signal.
How to Make the Joining Process Easier as a Student
You don’t need complicated preparation to become comfortable with Gimkit game-code joining.
A few simple habits are enough.
Know the basic sequence
Remember:
Code → Name → Lobby → Host → Game
Once you know those five stages, the process becomes much easier to follow.
Read before tapping
On touchscreen devices, take a second to check what you entered before moving forward.
Follow the teacher’s naming instructions
Don’t make the player-name step more complicated than it needs to be.
Stay in the lobby
Once you’ve successfully joined, let the host handle the next stage.
Pay attention when gameplay begins
The joining process is only the preparation. The actual classroom activity starts when the host launches the game.
A Real Classroom Example
Imagine a teacher has prepared a Gimkit activity for a class.
The teacher announces:
“Take out your Chromebook. We’re starting a Gimkit game. Here’s the game code.”
The code is displayed on the classroom screen.
You begin
You open Chrome and go to the Gimkit game-joining page.
You enter the code
You type the characters exactly as shown and check them before continuing.
You identify yourself
The next stage asks you to provide your player name. You enter the name according to your teacher’s classroom instructions.
You reach the lobby
Your screen now shows that you have entered the session. Your classmates are still joining.
You wait
You leave the page open and listen to the teacher.
The teacher starts the activity
The session moves from the waiting stage into gameplay.
You play
You now follow the instructions presented by the game and your teacher.
Notice how little technical knowledge the student actually needs. The host handles the game setup; the student’s job is to use the provided code, identify themselves correctly, wait in the session, and participate once the activity begins.
What Happens After You Successfully Join?
Successfully entering the game is not the end of the experience. It is the point where the joining task hands over to the gameplay experience.
Your next priorities are:
Confirm your identity → Remain in the session → Listen to the host → Watch for the start → Participate
The exact gameplay interface can differ according to the activity being hosted, so students should pay attention to the instructions provided when the session begins rather than assuming every Gimkit game works identically.
This is why the joining process should be treated as its own stage rather than confused with the entire Gimkit experience.
Why Following the Correct Order Matters
The game-code joining process is designed around a logical progression.
You first identify the session.
Then you identify yourself.
Then you wait for the session to begin.
That sequence matters because each stage prepares the next one.
Code
Tells the system which hosted game you are trying to enter.
Player name
Identifies you within that session.
Lobby
Places you in the waiting area with the other participants.
Host start
Moves the group from preparation into gameplay.
Once you understand that structure, joining becomes much more intuitive.
Frequently Asked Questions
Where do I enter a Gimkit game code?
Enter the game code on Gimkit’s game-joining page. Once you reach the code-entry screen, type the code provided by your teacher and continue through the joining process.
What should I do after entering the game code?
After submitting the code, continue through the next screen and provide your player name if requested. Once your entry is complete, you should reach the game’s waiting lobby, where you remain until the host starts the activity.
What name should I use when joining a Gimkit game?
Use the name or nickname your teacher has instructed the class to use. If the teacher has a specific naming format, follow it rather than choosing an unrelated nickname. Check the spelling before continuing.
How do I know that I joined the Gimkit game successfully?
A key sign is reaching the game’s lobby after completing the code and player-name steps. If you are in the waiting area and ready for the host to begin, you have moved beyond the initial code-entry stage.
Why am I in a lobby instead of playing immediately?
The lobby is the waiting stage before the host starts gameplay. Your teacher may be waiting for other students to join or giving the class instructions before starting the activity.
What should I do while waiting in the Gimkit lobby?
Keep the game page open, check that your player name is correct, listen to your teacher, and wait for the host to start the session. You generally do not need to enter the code again once you are already in the lobby.
Can I join a Gimkit game from a Chromebook?
Yes. A Chromebook can be used for the same basic process: open the browser, reach the game-joining page, enter the provided code, complete the player-name step, and wait in the lobby.
Can I join a Gimkit game from my phone?
Yes. You can use a mobile browser to access the game-joining page, enter the game code, provide your player name, and wait for the host to start the session.
What happens when the teacher starts the game?
The session moves from the waiting lobby into the actual game. At that point, follow the instructions shown on your screen and any directions provided by your teacher.
Do I need to understand the game mode before joining?
No. For the basic joining process, the important information is the game code and the instructions provided by your teacher. The host selects the activity and controls the session.
What if my classmates are still joining after I reach the lobby?
Stay in the lobby and wait. The teacher may be giving other students time to enter before starting the activity. You do not need to restart the joining process simply because other players have not arrived yet.
Should I leave the lobby after joining?
Generally, no. Once you have entered the lobby, remain on the game page and wait for the host. Leaving unnecessarily can interrupt your preparation for the activity.
Quick Reference: How to Join a Gimkit Game Using a Game Code
For students who only need the essential process, remember this:
1. Get the code
Receive the current game code from your teacher.
2. Open the joining page
Use your browser to reach the Gimkit game-joining page.
3. Enter the code
Type every character carefully and check the entry.
4. Continue
Submit the code and move to the next stage.
5. Enter your player name
Follow your teacher’s naming instructions.
6. Enter the lobby
Once you reach the waiting area, you have completed the main joining process.
7. Wait
Keep the page open and listen to the host.
8. Start playing
When the teacher begins the game, follow the instructions and participate.
Final Thoughts
Joining a Gimkit game with a game code is easiest when you treat it as a short sequence rather than a collection of separate actions.
Get the code. Open the joining page. Enter the code. Provide your player name. Enter the lobby. Wait for the host. Then play.
The most important distinction for a new student is that joining and playing are not the same stage. Entering the code gets you into the session, while reaching the lobby means you are ready and waiting for the host. Once the teacher starts the activity, your attention shifts from joining to participating.
Whether you are using a Chromebook in a classroom, a laptop at home, or a phone or tablet during a remote session, the student-side process follows the same basic path. The key is to enter the information carefully, follow the teacher’s instructions, and avoid unnecessary actions once you have successfully reached the lobby.
For a first-time student, the entire process can be remembered in one simple line:
Game Code → Player Name → Lobby → Host Starts → Play.