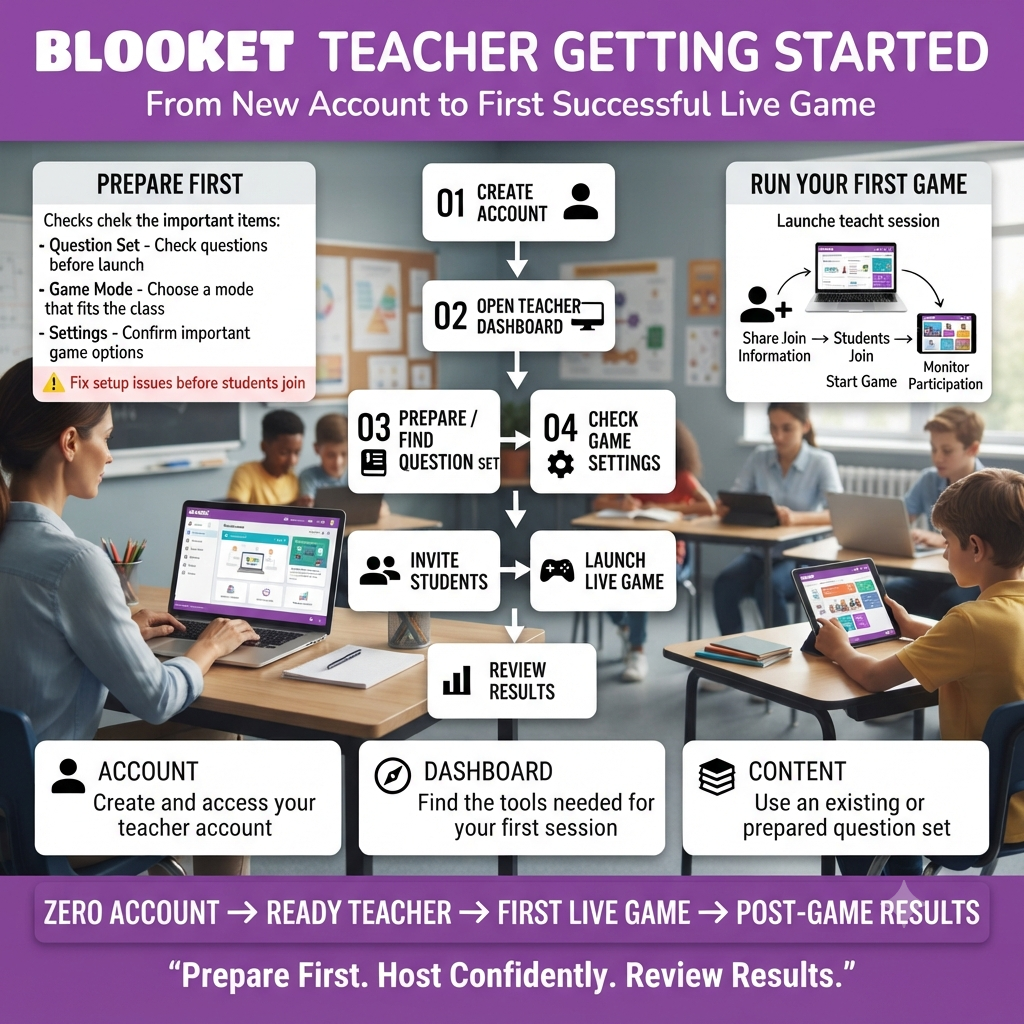
A first Blooket session doesn’t need to feel like a leap of faith. This Blooket teacher getting started guide walks through the actual sequence a brand-new teacher account goes through — creating the account, understanding what’s free versus what may require an upgrade, navigating the dashboard, finding or preparing a question set, and running a first live game from start to finish — so the first time you host, nothing on screen feels completely unfamiliar.
For a new teacher, the biggest challenge usually isn’t understanding what Blooket is. It’s knowing what to do first, what can wait, and which settings actually matter before students join. A few minutes of preparation can prevent common problems such as students joining the wrong screen, discovering a question-set error after the game has started, or choosing a game mode that doesn’t fit the size of the class.
This guide is deliberately focused on the account-and-setup layer of Blooket, not the deeper content-creation layer. If you already have an account and want detailed help building question sets, designing classroom activities, comparing game modes, or using Blooket for assessment, those can be treated as separate topics. Here, the goal is simpler: get a new teacher from zero account → first successful live session → useful post-game results.
Looking for comprehensive classroom resources and educational technology insights? Explore GimkitApp for expert guides, teaching strategies, game modes, and the latest updates to enhance student engagement.
Creating a Blooket Teacher Account
Every Blooket teacher getting started journey begins by visiting Blooket.com and selecting “Sign Up” to create a new account. The registration process is designed to separate teachers from students because the two account types have different purposes inside the platform.
When the sign-up flow asks whether the account belongs to a Student or Teacher, a teacher should select Teacher. This distinction is important because teacher accounts provide access to the tools needed to organize classroom activities, create or use question sets, host games, assign activities, and review available performance information.
Step 1: Start the registration process
Begin at Blooket’s official website and select the option to create an account. From there, follow the registration prompts and select the teacher account type when asked.
The process is relatively short, but new users should avoid rushing through the initial setup. The account created here becomes the central place from which future games, question sets, assignments, and reports are managed.
Step 2: Complete the age and location information
The sign-up process includes a date-of-birth entry and a checkbox for users located outside the United States.
Blooket requires account holders to meet its minimum age requirement, which is important for teachers creating an account for themselves. Student participation is handled differently because students can often participate in teacher-hosted games without needing to create their own full Blooket account.
This distinction is worth understanding before your first classroom session:
Teacher account: used to create, discover, host, assign, and manage activities.
Student participation: students can join a teacher-hosted game using the available joining method without necessarily creating their own account.
Classroom workflow: the teacher remains the person controlling the live session.
That separation makes the initial setup much easier because you don’t need to create individual student accounts just to test your first hosted game.
Step 3: Choose a sign-up method
Two common registration routes are available:
Google sign-up — a convenient option for teachers already using Google Workspace or a Google account.
Email sign-up — a traditional registration method using an email address, confirmation process, and password.
Google sign-up can be particularly convenient in schools where teachers already use Google services for classroom communication and productivity. It reduces the number of separate credentials a teacher has to remember.
With email registration, the process involves entering an email address, receiving the required confirmation information, completing verification, and setting a secure password.
Quick Note About School Email Addresses
Some school-managed email systems have restrictions that can interfere with account verification or automated messages. If a school-issued address doesn’t receive the expected confirmation message, check the school’s spam or filtering system before assuming the Blooket registration itself has failed.
In environments where external emails are heavily filtered, an alternative approved email address may be necessary.
The important point is not to repeatedly restart registration without first checking whether the verification message has simply been delayed or filtered.
Step 4: Choose your username
Once the account verification process is complete, you’ll typically be asked to establish the identity details associated with the account, including a username.
Choose something professional and recognizable if the account will be used regularly for teaching. A teacher account is easier to manage when the account name clearly identifies the educator or classroom rather than using a temporary nickname that may become confusing later.
You’ll also need to agree to Blooket’s applicable Privacy Policy and Terms of Service before completing account creation.
Common Sign-Up Mistake: Leaving Before Completion
One simple mistake new users make is closing the sign-up process before every required step has been completed.
If the registration process isn’t finished, you shouldn’t assume the partial information has been saved. If the account isn’t successfully created, you may need to restart the process.
For that reason, it’s better to complete the registration in one sitting rather than beginning the process and leaving it unfinished.
Free Blooket Account vs. Blooket Plus
A new teacher doesn’t necessarily need to purchase anything before running a first Blooket activity.
Every new teacher account begins with access to Blooket’s available free functionality, while paid options are designed to expand capabilities or capacity rather than make the basic concept of classroom hosting possible.
For a teacher who is completely new to Blooket, this distinction matters.
The first question shouldn’t be:
“Which paid plan should I buy?”
It should be:
“What can I already accomplish with the account I have?”
For many teachers, the answer is enough to run an initial classroom experiment without immediately upgrading.
What the Free Tier Is Useful For
A free teacher account can provide the basic foundation needed to explore the platform, including activities such as:
Creating or working with question sets
Discovering existing question sets
Hosting live classroom games
Testing the student joining process
Exploring available game modes
Using assignments where supported
Reviewing available session information
This makes the free account particularly useful during the learning stage.
A teacher can first understand how Blooket fits into the classroom before deciding whether additional paid functionality is actually necessary.
When Might an Upgrade Matter?
The value of a paid plan depends on the teacher’s specific requirements.
For example, a larger class, additional classroom needs, expanded reporting capabilities, or access to particular premium features may make an upgrade more useful.
However, these requirements are difficult to judge before actually using the platform.
That’s why a practical progression is:
Create account → test Blooket → host a small session → identify limitations → decide whether an upgrade solves a real problem.
This approach is more useful than upgrading simply because a paid option exists.
Pro Tip: Test Before You Upgrade
Don’t upgrade before you’ve hosted a first session unless you already know you need a specific paid capability.
Run at least one live game using the free account. You’ll quickly discover whether your class size, preferred game modes, reporting requirements, or teaching workflow actually create a limitation.
An upgrade should solve a known classroom problem, not simply be part of the setup process.
For the latest gaming news, expert reviews, and walkthroughs, readers can also visit IGN, one of the world’s leading gaming websites.
Understanding the Blooket Teacher Dashboard
After account creation, the dashboard becomes the main starting point for your Blooket workflow.
This is where a teacher can move between the major activities that make up the platform experience, including finding question sets, creating content, hosting games, assigning activities, and reviewing previous activity.
For a first-time teacher, the dashboard can initially look like a collection of different options. The easiest way to understand it is to think of it as a decision point:
What do I want to do right now?
If you need questions, look for a set.
If you need to create content, move toward the creation tools.
If your questions are ready and students are waiting, move toward hosting.
If the game is already finished, look for the relevant results or reporting information.
This mental model makes the interface much easier to understand than trying to memorize every button.
Explore Before You Host
A useful first-day exercise is to spend a few minutes exploring the dashboard without immediately starting a live game.
Look through:
Your available question sets
The Discover area
Creation options
Hosting options
Assignment-related tools
Previous session or reporting areas
Your account and profile settings
You don’t need to understand every feature during the first five minutes.
The goal is simply to recognize where the important tools are located.
Expert Insight
Spend your first few minutes exploring Discover before building a question set entirely from scratch.
Seeing how completed question sets are organized can help a new teacher understand what a usable Blooket activity looks like. It can also prevent unnecessary work when another educator has already created a useful set covering the same subject.
That doesn’t mean every public set should automatically be used. Teachers should still review questions for accuracy, age appropriateness, curriculum alignment, wording, and difficulty before assigning them to students.
Choosing Your First Question Set
Before a live Blooket game can become a useful classroom activity, you need something for students to answer.
There are generally two paths:
Find an existing question set
Create your own question set
For a first-time teacher, using an existing set can be the fastest way to learn the hosting process.
Option 1: Discover an Existing Set
The Discover library can help teachers find question sets related to a particular topic.
Search terms can be based on things such as:
Subject
Grade level
Topic
Vocabulary
Curriculum area
Standard
Specific concept
For example, instead of creating a complete set about a topic immediately, a teacher can search for that topic and examine available results.
Before using an existing set, preview it carefully.
Check:
Are the answers correct?
Are the questions relevant to your lesson?
Is the difficulty appropriate?
Are there outdated references?
Are there confusing questions?
Does the number of questions fit your available class time?
Does the set match the learning objective?
A set being popular does not automatically mean it is perfect for your specific students.
Option 2: Create Your Own Set
Creating your own question set gives you more control over what students see.
This is particularly valuable when the Blooket activity is connected to a specific lesson, textbook section, unit, review session, vocabulary list, or assessment objective.
A teacher-created set can be designed around the exact knowledge students are expected to practice.
However, creating everything from scratch isn’t always necessary.
A useful middle ground is to find an existing set and use it as inspiration or a starting point, then adjust the content where appropriate.
Running Your First Live Blooket Game
This is the core sequence every Blooket teacher getting started guide should explain before a real classroom session.
Knowing the process in advance changes the experience completely. Instead of trying to figure out the interface while thirty students are watching, you already know what the next screen should look like.
Step 1: Find a Question Set
From the dashboard, locate either:
A question set you’ve already created
A question set you’ve saved or selected
A suitable set from the Discover library
Open the set you want to use.
Don’t wait until students are sitting in front of you to make this decision.
The question set should already be selected before you begin the hosting process.
Step 2: Select “Host”
Open the question-set page and choose the hosting option.
This transitions the workflow from content selection into live game setup.
At this point, you’re no longer deciding what questions to use. You’re deciding how students will experience those questions.
Step 3: Choose a Game Mode
Blooket offers different game modes, and the available options can vary depending on the current platform and set.
The important thing for a first-time teacher isn’t memorizing every mode.
Instead, consider:
How many students are participating?
How much time do you have?
Is the activity individual or team-oriented?
Is the goal review, practice, competition, or engagement?
Does the selected mode support the intended classroom structure?
A game mode isn’t simply a visual theme. It can influence how students interact with questions and how the session feels.
For a first game, choose something you understand rather than selecting a mode purely because it looks exciting.
Step 4: Confirm the Mode
After selecting the game mode, continue into its setup flow.
This is where the platform may present additional configuration options.
Take a moment to read them rather than immediately clicking through every screen.
Step 5: Adjust the Game Settings
The available settings depend on the selected game mode, but may include options related to gameplay behavior, question order, teams, timing, or other session-specific mechanics.
For your first game, avoid changing every setting just to see what happens.
Instead, identify the settings that directly affect your lesson.
For example:
Need a quick review?
Keep the session simple and time-efficient.
Have a large class?
Pay close attention to the mode’s player guidance and practical classroom capacity.
Want students working in teams?
Check team-related settings before starting.
Running a short lesson?
Avoid settings that unnecessarily extend the activity.
The best configuration is not the one with the most customization. It’s the one that supports the learning objective with the least friction.
Step 6: Select “Host Now”
Once the settings are ready, select “Host Now” to generate the live session.
This is the point where the classroom activity becomes joinable.
The resulting screen normally provides the information students need to enter the game.
How Students Join a Blooket Game
Once the live game has been created, students need a way to join.
Depending on the available interface, students can use several joining methods.
Game Code
The teacher can display the game code, allowing students to enter it through the appropriate Blooket joining page.
This is one of the simplest options for a physical classroom because the teacher can project the code at the front of the room.
QR Code
A QR code can provide another convenient joining method when students have compatible phones or tablets.
Instead of manually typing the code, students can scan the displayed QR code.
This can reduce typing mistakes, particularly with younger students.
Shared Join Link
A shared joining link can be especially useful for remote learning, virtual classes, learning management systems, or classroom chat platforms.
Instead of telling every student where to go and what code to enter, the teacher can share the appropriate link through the communication system already being used by the class.
Step 7: Wait in the Lobby
Once students begin joining, the lobby provides a useful checkpoint.
Don’t feel pressured to start immediately just because the first few students have entered.
Use the lobby to confirm that:
Students are joining the correct game
The expected number of students is appearing
The class understands the joining process
There aren’t obvious connection problems
Students aren’t accidentally joining an unrelated session
If your class has thirty students and only eighteen appear, launching immediately may create unnecessary confusion.
Waiting another minute can be much more efficient than stopping the game later to troubleshoot missing players.
Step 8: Start the Game
Once the class is ready, select Start.
At this point, the live session begins and students can interact with the questions according to the selected game mode.
This is why a short teacher-side rehearsal is valuable. You’ve already seen the sequence:
Question set → Host → Game mode → Settings → Host Now → Join screen → Lobby → Start
Once that sequence becomes familiar, the process becomes much faster.
Best Practice: Prepare the Join Screen Early
One of the easiest ways to improve the first-session experience is to prepare the joining information before students are ready to begin.
Project the join screen, including the available game code and QR option, before the activity officially starts.
This gives students time to enter the session while you handle other classroom tasks.
It also avoids the common situation where the teacher starts the game setup only after everyone is already waiting.
A small amount of preparation can save several minutes of classroom time.
What Happens After the Game Ends?
The end of the game is not necessarily the end of the learning activity.
Once a live session finishes, Blooket provides a results experience and relevant session information that can feed into the platform’s reporting tools.
For a new teacher, this is one of the most important areas to explore because gameplay tells you what students did, while results can help you think about what students understood.
Instead of simply asking:
“Who won?”
consider asking:
Which questions caused difficulty?
Were students consistently missing one concept?
Did most students understand the vocabulary?
Was the difficulty appropriate?
Did the activity reveal a misconception?
Should the class review a particular topic before moving forward?
This turns Blooket from a purely competitive activity into a potential instructional feedback tool.
Review the Questions, Not Just the Winners
A leaderboard can be fun and motivating, but it shouldn’t be the only result a teacher examines.
Imagine that one question was answered incorrectly by most of the class.
That may indicate:
The concept wasn’t taught clearly enough
The question was poorly worded
The answer choices were confusing
Students misunderstood the underlying concept
The material needs additional practice
The result therefore becomes useful evidence for the next lesson.
Did You Know?
The same underlying question-set content can be used through different Blooket activity formats rather than treating every game as a completely separate piece of content.
This distinction is useful when planning lessons.
Think of the question set as the content, while the selected activity format determines how students interact with that content.
That means one well-designed question set can potentially support multiple stages of learning, such as review, practice, reinforcement, or homework.
Using Your First Game as a Teacher Test
Your first Blooket game doesn’t have to be a major classroom event.
In fact, treating the first session as a controlled test can make the platform much easier to learn.
Before introducing it to an entire class, consider running a small trial.
You can check:
Whether your account works correctly
Whether the selected question set loads as expected
Whether the game mode is available
How students join
How the lobby looks
How the game starts
What happens when the session ends
Where results can be found afterward
This gives you a complete mental map of the platform.
Then, when the real class arrives, you’re not learning the software and teaching the students simultaneously.
Common Mistakes New Blooket Teachers Make
1. Hosting the First Game Without a Dry Run
Even a short solo or practice test can expose problems before the entire class sees them.
A quick test may reveal:
A spelling mistake
An incorrect answer
A confusing question
An unexpectedly difficult question
An unsuitable game mode
A setting you don’t understand
Fixing these issues before class is much easier than explaining them after students have already started.
2. Skipping the Discover Library
Some teachers immediately assume they need to create every question themselves.
That isn’t always necessary.
The Discover library may contain existing sets that can save substantial preparation time.
However, discovery should never replace professional judgment. Always review public content before using it with students.
3. Choosing a Game Mode Without Considering Class Size
A game mode can behave differently depending on the number of participants and the type of activity.
Before starting, compare the expected number of students with the mode’s displayed guidance.
This is especially important for larger classes.
Don’t wait until students are already connected to discover that your preferred configuration isn’t ideal for the size of the group.
4. Not Explaining the Joining Process
Students may know how to use technology but still not know how to join a particular Blooket session.
Explain the process clearly:
Where do I go? → What code do I enter? → What name should I use? → What do I do after joining?
A thirty-second explanation can prevent several minutes of repeated questions.
5. Starting Before Everyone Is Ready
The first few students joining does not mean the entire class has joined.
Use the lobby as a final checkpoint.
If several students are missing, determine whether the problem is:
A wrong code
A connection issue
A device problem
A student entering the wrong page
A student simply needing additional instructions
6. Assuming Blooket Plus Is Required
A new teacher may see premium options and assume the platform cannot be used effectively without paying.
That isn’t the right starting assumption.
Begin with the available free functionality, identify your real classroom needs, and only then decide whether additional capabilities justify an upgrade.
7. Ignoring the Results After the Game
A successful game isn’t only about who finished first.
The results can provide useful information for future instruction.
If students repeatedly miss the same concept, the teacher has a reason to revisit that material.
A Simple First-Day Blooket Checklist
Before the class:
Create or access your teacher account
Confirm that you can log in
Choose your question set
Preview the questions
Check the answer choices
Select an appropriate game mode
Review the available settings
Test the joining process if possible
Prepare the game code or QR screen
Know how you’ll end the session
Know where to review the results afterward
During the session:
Display the joining information
Give students clear joining instructions
Watch the lobby
Confirm that the expected students have joined
Start only when the class is ready
Monitor the session rather than constantly changing settings
Keep the activity connected to the lesson objective
After the session:
Review the results
Look beyond the winner
Identify difficult questions
Note common misunderstandings
Decide whether students need another round
Reuse or adjust the question set when appropriate
This checklist turns the Blooket experience into a repeatable classroom routine rather than something you have to relearn every time.
Frequently Asked Questions
Do I need a paid account to start using Blooket as a teacher?
No. A new teacher can begin with the available free account functionality and use that experience to learn the platform before deciding whether an upgrade is necessary.
The free starting point is particularly useful for teachers who are still determining how Blooket fits into their classroom.
Paid plans can become relevant when a teacher needs additional capacity or specific premium capabilities, but purchasing a plan should be based on an actual classroom requirement rather than simply being part of account setup.
How old do I need to be to create a Blooket teacher account?
Blooket has an age requirement for account holders, so teachers should review the platform’s current Terms of Service and account requirements when registering.
The important distinction is that a teacher creating and managing an account is different from students simply joining a teacher-hosted live game.
Students do not necessarily need individual accounts simply to participate in every teacher-hosted activity.
What’s the fastest way for students to join my first Blooket game?
The fastest method depends on the classroom environment.
For a physical classroom, displaying the game code and QR code together can make joining straightforward.
For a virtual classroom, sharing the available join link through the platform students already use can reduce the need for manual typing.
Whichever method you choose, display the joining information before you expect the game to start.
Can I use Blooket without creating my own question set?
Yes, teachers can explore available question sets rather than creating every set from scratch.
The Discover library can be particularly useful for finding existing material.
However, always preview an external set before using it. Check the questions, answers, difficulty, relevance, and suitability for your students.
A convenient set isn’t automatically an appropriate instructional resource.
Can I switch between Google and email sign-up later?
Your original authentication method affects how you normally access your account.
If you initially register through Google, your normal login workflow will be associated with that authentication method. If you use email registration, you’ll use the account credentials established through that process.
If you need to change account access methods, check Blooket’s current account-support guidance rather than assuming that simply registering again will merge the accounts.
What should I do differently for my very first live game?
Keep the first game simple.
Run a quick test of your question set beforehand, choose a game mode that fits your class size, prepare the join screen before students are ready, and explain the joining process clearly.
Most importantly, don’t try to learn every Blooket feature during the first session.
Your first goal is simply:
Students join → students understand the activity → game runs successfully → teacher reviews the results.
Once that workflow is comfortable, you can experiment with more advanced game modes, question-set strategies, assignments, reporting, and classroom routines.
Should I create my own question set or use one from Discover?
Either approach can work.
If you’re learning Blooket for the first time, an existing set can help you become familiar with hosting without spending additional preparation time.
If the activity needs to match a specific lesson objective, textbook chapter, vocabulary list, assessment standard, or student misconception, creating or customizing your own set may provide better instructional control.
The strongest approach is often not choosing one permanently. Use existing resources when they fit, create original material when precision matters, and always review the final questions before presenting them to students.
Is Blooket only useful for competitive classroom games?
No. Competition is one visible part of the experience, but the underlying question-set structure can also support review, practice, reinforcement, homework-style assignments, and instructional feedback.
The educational value depends heavily on how the teacher connects the activity to the learning objective.
A game can be entertaining without producing meaningful learning. A well-designed question set combined with appropriate classroom discussion can make the same activity much more instructionally useful.
What if students have trouble joining?
Start with the simplest checks.
Confirm that students are using the correct joining page or link, that the game code was entered correctly, and that the teacher is still displaying the active lobby.
If one student cannot join while everyone else can, the issue may be device-, browser-, network-, or account-related rather than a problem with the game itself.
Avoid restarting the entire session immediately. First determine whether the problem affects one student or the whole class.
Should I use Blooket for assessment?
Blooket can be useful for practice and formative feedback, but teachers should distinguish between game-based review and a formal assessment.
If the goal is to identify misconceptions quickly, a Blooket session can provide useful signals.
If the result will be used for high-stakes grading or formal evaluation, teachers should consider whether the game’s competitive mechanics, timing, question design, and technology requirements are appropriate for that purpose.
Use the platform according to the educational decision you are trying to make, not simply because it produces a score.
Professional Recommendations & Expert Reviews
Blooket Teacher Getting Started begins with understanding how the platform can support interactive classroom learning.
Blooket Teacher Getting Started helps educators become familiar with the main areas they will use regularly.
Blooket Teacher Getting Started encourages teachers to explore the available question content before hosting a classroom activity.
Blooket Teacher Getting Started starts with identifying a clear learning objective for the activity.
Blooket Teacher Getting Started helps teachers connect interactive games with existing lesson plans.
Blooket Teacher Getting Started encourages educators to prepare their question material before inviting students.
Blooket Teacher Getting Started helps teachers understand how students participate in a hosted activity.
Blooket Teacher Getting Started supports smoother classroom sessions by encouraging preparation in advance.
Blooket Teacher Getting Started helps educators choose an activity that matches the purpose of the lesson.
Blooket Teacher Getting Started encourages teachers to consider whether students need practice, review, reinforcement, or assessment.
Blooket Teacher Getting Started helps educators become comfortable with the basic hosting process.
Blooket Teacher Getting Started encourages teachers to explain participation instructions before starting.
Blooket Teacher Getting Started helps reduce confusion among students who are using the platform for the first time.
Blooket Teacher Getting Started supports classroom organization by establishing clear expectations.
Blooket Teacher Getting Started encourages teachers to test their planned activity before using it with students.
Blooket Teacher Getting Started helps educators identify potential issues before a live classroom session.
Blooket Teacher Getting Started supports more confident technology use among teachers.
Blooket Teacher Getting Started encourages educators to begin with familiar topics and manageable activities.
Blooket Teacher Getting Started helps teachers introduce game-based learning gradually.
Blooket Teacher Getting Started supports a smooth transition from traditional instruction to interactive review.
Blooket Teacher Getting Started encourages educators to keep academic goals at the center of gameplay.
Blooket Teacher Getting Started helps teachers understand that game mechanics should support rather than distract from learning.
Blooket Teacher Getting Started encourages educators to select questions appropriate for student ability.
Blooket Teacher Getting Started helps teachers create more relevant classroom experiences.
Blooket Teacher Getting Started supports effective preparation for different subjects and grade levels.
Blooket Teacher Getting Started encourages teachers to monitor student participation during activities.
Blooket Teacher Getting Started helps educators recognize when students need additional explanation.
Blooket Teacher Getting Started supports using gameplay as a supplement to direct instruction.
Blooket Teacher Getting Started encourages teachers to review student performance after activities.
Blooket Teacher Getting Started helps educators identify concepts that require further teaching.
Blooket Teacher Getting Started supports formative learning by making review more interactive.
Blooket Teacher Getting Started encourages teachers to use different activities throughout a unit.
Blooket Teacher Getting Started helps prevent interactive lessons from becoming repetitive.
Blooket Teacher Getting Started supports classroom engagement when activities are carefully planned.
Blooket Teacher Getting Started encourages educators to set appropriate expectations around competition.
Blooket Teacher Getting Started helps teachers maintain a positive classroom atmosphere during competitive activities.
Blooket Teacher Getting Started supports students who may need additional time or encouragement.
Blooket Teacher Getting Started encourages educators to focus on participation and learning rather than rankings alone.
Blooket Teacher Getting Started helps teachers develop efficient routines for repeated classroom use.
Blooket Teacher Getting Started supports better lesson pacing by helping educators plan when gameplay should begin and end.
Blooket Teacher Getting Started encourages teachers to connect post-game discussion with the lesson objective.
Blooket Teacher Getting Started helps students understand why they are completing the activity.
Blooket Teacher Getting Started supports stronger learning when teachers discuss difficult questions after gameplay.
Blooket Teacher Getting Started encourages educators to use student responses as feedback for future instruction.
Blooket Teacher Getting Started helps teachers refine their approach through classroom experience.
Blooket Teacher Getting Started supports gradual improvement as educators become more familiar with the platform.
Blooket Teacher Getting Started encourages teachers to explore available content without overwhelming themselves with every feature.
Blooket Teacher Getting Started helps educators build confidence by mastering the basics first.
Blooket Teacher Getting Started supports organized classroom technology routines.
Blooket Teacher Getting Started encourages teachers to prepare backup activities when technology problems occur.
Blooket Teacher Getting Started helps educators use interactive games more purposefully.
Blooket Teacher Getting Started supports better classroom participation through clear instructions and engaging activities.
Blooket Teacher Getting Started encourages teachers to adapt activities based on student reactions.
Blooket Teacher Getting Started helps educators discover which types of gameplay work best for their students.
Blooket Teacher Getting Started supports meaningful integration with regular teaching rather than treating games as isolated entertainment.
Blooket Teacher Getting Started encourages educators to balance interactive activities with discussion, explanation, practice, and reflection.
Blooket Teacher Getting Started helps teachers develop a repeatable workflow for planning and hosting classroom games.
Blooket Teacher Getting Started ultimately gives educators a practical foundation for using interactive gameplay, organized question content, clear classroom expectations, and post-activity reflection to create engaging learning experiences while keeping instructional goals at the center.
Summary
Getting a Blooket teacher account off the ground comes down to four stages: signing up with the right account type, understanding that the free tier already covers a complete first session, getting comfortable with the dashboard’s Create/Discover/Host layout, and walking through the hosting flow once before doing it live in front of a class. None of it requires the deeper skills of building question sets or mastering every game mode — those come next. This guide is the fifteen minutes that make everything after it feel familiar instead of improvised.